Listing the files in a folder is one of the activities which cannot be achieved using normal Excel formulas. I could tell you to turn to VBA macros or PowerQuery, but then any non-VBA and non-PowerQuery users would close this post instantly. But wait! Back away from the close button, there is another option.
For listing files in a folder we can also use a little-known feature from Excel version 4, which still works today, the FILES function.
The FILES function
If you search through the list of Excel functions, FILES is not listed. The FILES function is based on an old Excel feature, which has to be applied in a special way. The instructions below will show you step-by-step how to use it.
Create a named range for the FILES function
The first step is to create a named range, which contains the FILES function. Within the Excel Ribbon click Formulas -> Define Name

Within the New Name window set the following criteria:
- Name: listFiles
Can be any name you wish, but for our example we will be using listFiles. - Refers to: =FILES(Sheet1!$A$1)
Sheet1!$A$1 is the sheet and cell reference containing the name of the folder from which the files are to be listed.
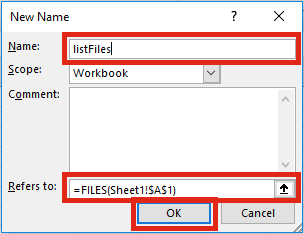
Click OK to close the New Name window.
Apply the function to list files
The second step is to set-up the worksheet to use the named range.
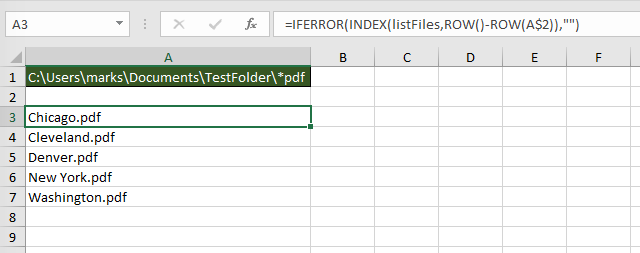
In Cell A1 (or whichever cell reference used in the Refers to box) enter the folder path from which to list the files, followed by an Asterisk ( * ). The Asterisk is the wildcard character to find any text, so it will list all the files in the folder.
Select the cell in which to start the list of files (Cell A3 in the screenshot below), enter the following formula.
=INDEX(listFiles,1)
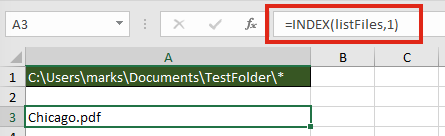
The result of the function will be the name of the first file in the folder.
To retrieve the second file from the folder enter the following formula
=INDEX(listFiles,2)
It would be painful to change the file reference number within each formula individually, especially if there are hundreds of files. The good news is, we can use another formula to calculate the reference number automatically.
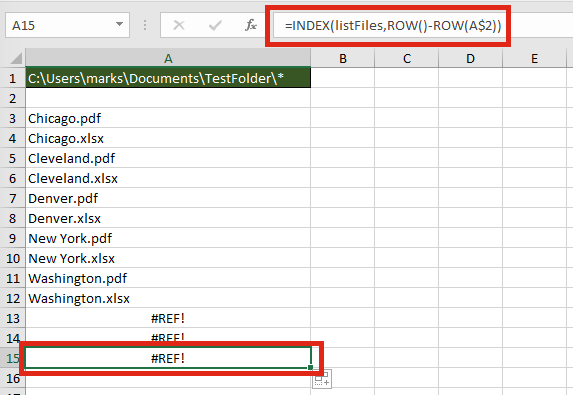
=INDEX(listFiles,ROW()-ROW(A$2))
The ROW() function is used to retrieve the row number of a cell reference. When used without a cell reference, it returns the row number of the cell in which the function is used. When used with a cell reference it returns the row number of that cell. Using the ROWS function, it is possible to create a sequential list of numbers starting at 1, and increasing by 1 for each cell the formula is copied into.
If the formula is copied down further than the number of files in the folder, it will return a #REF! error.
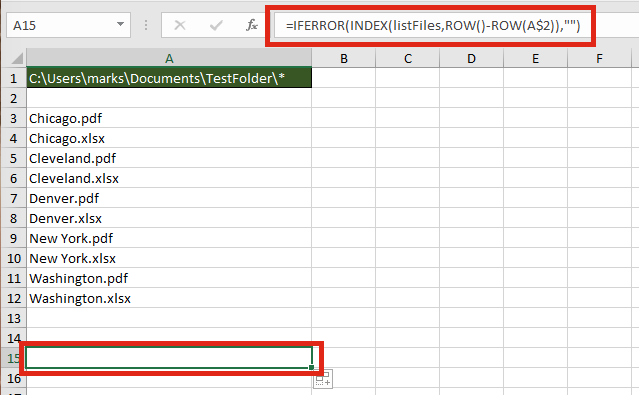
Finally, wrap the formula within an IFERROR function to return a blank cell, rather than an error.
=IFERROR(INDEX(listFiles,ROW()-ROW(A$2)),"")
Listing specific types of files
The FILES function does not just list Excel files; it lists all file types; pdf, csv, mp3, zip, any file type you can think of. By extending the use of wildcards within the file path it is possible to restrict the list to specific file types, or to specific file names.
The screenshot below shows how to return only files with “pdf” as the last three characters of the file name.
The wildcards which can be applied are:
- Question mark ( ? ) – Can take the place of any single character.
- Asterisk ( * ) – Represents any number of characters
- Tilde ( ~ ) – Used as an escape character to search for an asterisk or question mark within the file name, rather than as a wildcard.
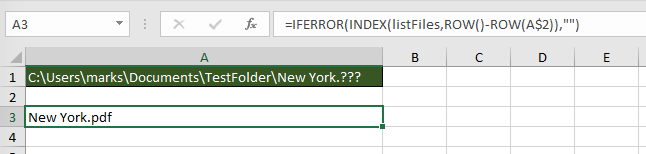
The screenshot below shows how to return only files with the name of “New York.“, followed by exactly three characters.
Advanced uses for the FILES named range
Below are some ideas of how else you could use the FILES function.
Count the number of files
The named range created works like any other named range. However, rather than containing cells, it contains values. Therefore, if you want to calculate the number of files within the folder, or which meet the wildcard pattern use the following formula:
=COUNTA(listFiles)
Create hyperlinks to the files
Wouldn’t it be great to click on the file name to open it automatically? Well . . . just add in the HYPERLINK function and you can.
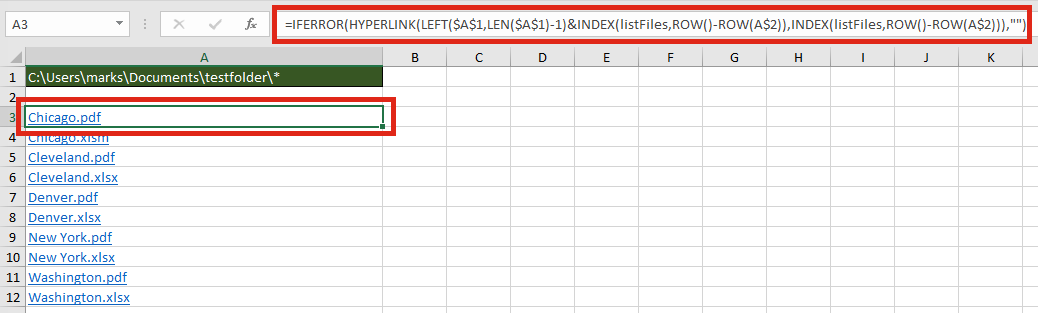
The formula in Cell A3 is:
=IFERROR(HYPERLINK(LEFT($A$1,LEN($A$1)-1)&INDEX(listFiles,ROW()-ROW(A$2)),INDEX(listFiles,ROW()-ROW(A$2))),"")
Check if a specific file exists within a folder
It isn’t necessary to list all the files to find out if a file exists within the folder. The MATCH function will return the position of the file within the folder.
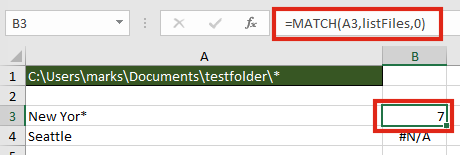
The formula in cell B3 is:
=MATCH(A3,listFiles,0)
In our example, a file which contains the text “New Yor*” exists, as the 7th file, therefore a 7 is returned. Cell B4 displays the #N/A error because “Seattle” does not exist in the folder.
Find the name of the next or previous file
The files returned are in alphabetical order, therefore it is possible to find the next or previous file using the INDEX / MATCH combination.
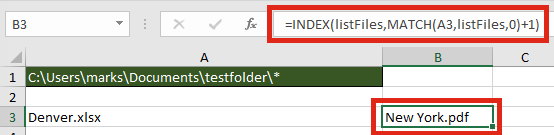
The next file after “Denver.xlsx” is “New York.pdf“. The formula in Cell B3 is:
=INDEX(listFiles,MATCH(A3,listFiles,0)+1)
Retrieve values from each file with INDIRECT
The INDIRECT function can construct a cell reference using text strings. Having retrieved the list of files in a folder, it would be possible to obtain values from those files.

The formula in Cell B3 is:
=INDIRECT("'"&LEFT($A$1,LEN($A$1)-1)&"["&A3&"]Sheet1'!$A$1")
For INDIRECT to calculate correctly the file does need to be open, so this may be a significant flaw in this option.
Usage notes
When working with the FILES function there are a few things to be aware of:
- The file path and file name is not case sensitive
- Files are returned in alphabetical order
- Folders and hidden files are not returned by the function
- The workbook must be saved as a “.xlsm” file format